 The design for this came along due to sloppy knitting really – I decided not to bother working out the rate of increases and ended up with a long tail at the start. Instead of ripping back I decided this long tail would be knotted to form a “button”, and a “buttonhole” at the other end would complete the fastening. That way it is also adjustable, and when it stretches from being worn you can just tie a knot further up, or use a figure-of-eight knot. It is reversible too.
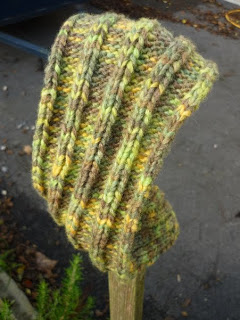
The headband is knitted lengthways, using increases to make it wider in the middle than the ends. It doesn’t really matter what the tension of the yarn you are using is – you could just start off with 4 stitches and increase until it’s the width you want, then decrease.
I used some lovely Italian yarn I was given called Arianna Grignasco, and knit it on smaller needles than recommended to get a nice rib. I used 4mm needles. (It recommended 6-7mm)

Gauge:
On 4mm needles, using k2, p4 rib;
16sts or 28 rows = 4”
CO – cast on
st/s stitch/es
k – knit
p - purl
m1 – make one
kfb – knit into front and back of next st

Pattern:
CO 4 sts
k all sts
p all sts
k2, m1, k2
(p2, k1, p2
k2, p1, k2) do these 2 rows 3 times
p2, kfb, p2
(k2, p2, k2
p2, k2, p2) three times
k2, p2, k2
p2, k1, m1, k1, p2
(k2, p3, k2
p2, k3, p2) twice
(k2, p1, k1, p1, k2
p2, k1, p1, k1, p2) twice
k2, p1, kfb, p1, k2
(p2, k1, p2, k1,p2
k2, p1, k2, p1, k2) twice
p2, kfb, p2, kfb, p2
(k2, p2, k2, p2, k2
p2, k2, p2, k2, p2) twice
k2, p2, k2, p2, k2,
p2, k1, kfb, p2, kfb, k1, p2
(k2, p3, k2, p3, k2
p2, k3, p2, k3, p2) twice
k2, p1, kfb, p1, k2, p1, kfb, p1, k2
(p2, k1, p2, k1, p2, k1, p2, k1, p2
k2, p1, k2, p1, k2, p1, k2, p1, k2) twice
p2, kfb, p2, k1, p2, k1, p2, kfb, p2
(k2, p2, k2, p1, k2, p1, k2, p2, k2
p2, k2, p2, k1, p2, k1, p2, k2, p2) twice
k2, p2, k2, p1, k2, p1, k2, p2, k2
p2, k2, p2, kfb, p2, kfb, p2, k2, p2
(k2, p2, k2, p2, k2, p2, k2, p2, k2
p2, k2, p2, k2, p2, k2, p2, k2, p2) twice
k2, p2, k2, p2, k2, p2, k2, p2, k2
p2, k2, p2, k1, kfb, p2, kfb, k1, p2, k2, p2
(k2, p2, k2, p3, k2, p3, k2, p2, k2
p2, k2, p2, k3, p2, k3, p2, k2, p2) twice
k2, p2, k2, p3, k2, p3, k2, p2, k2
p2, k1, kfb, p2, k3, p2, k3, p2, kfb, k1, p2
(k2, p3, k2, p3, k2, p3, k2, p3, k2
p2, k3, p2, k3, p2, k3, p2, k3, p2) twice
k2, p3, k2, p3, k2, p3, k2, p3, k2
p2, k3, p2, k2, kfb, p2, kfb, k2, p2, k3, p2
(k2, p3, k2, p4, k2, p4, k2, p3, k2
p2, k3, p2, k4, p2, k4, p2, k3, p2) twice
k2, p3, k2, p4, k2, p4, k2, p3, k2
p2, k2, kfb, p2, k4, p2, k4, p2, kfb, k2, p2
Hooray, finally finished the end of the increases. Mark the end of the increases with a safety pin. Tie a knot in the beginning of your knitting. Measure the distance around your head. Divide this number in two (I was making mine 22” long, so half that is 11”) Now measure the distance from the end of your knot (see picture) to the end of the increases. This is x. The distance from the end of the increases to the middle of the hat is y.
2x + 2y = Circumference

Begin reducing.
P2, k1, k2tog, k1, p2, k4, p2, k4, p2, k1, k2tog, k1, p2
Continue in pattern for next 5 rows
P2, k3, p2, k1, k2tog, k1, p2, k1, k2tog, k1, p2, k3, p2
Continue in pattern for next 5 rows
P2, k1, k2tog, p2, k3, p2, k3, p2, k2tog, k1, p2
Continue in pattern for next 5 rows
P2, k2, p2, k1, k2tog, p2, k2tog, k1, p2, k2, p2
Continue in pattern for next 5 rows
P2, k2tog, p2, k2, p2, k2, p2, k2tog, p2
Continue in pattern for next 5 rows (k2, p1, k2….)
P2, k1, p2, k2tog, p2, k2tog, p2, k1, p2
Continue in pattern for next 5 rows
P2, k1, k2tog, k1, p2, k1, k2tog, k1, p2
(K2, p3, k2, p3, k2
P2, k3, p2, k3, p2) twice
K2, p3, k2, p3, k2
P2, k2tog, k1, p2, k1, k2tog, p2
(K2, p2, k2, p2, k2
P2, k2, p2, k2, p2) twice
K2, p2, k2, p2, k2
P2, k2tog, p2, k2tog, p2
(K2, p1, k2, p1, k2
P2, k1, p2, k1, p2) twice
K2, p1, k2, p1, k2
Now do the knot-hole (buttonhole)
1st side:
P1, p2tog, p1 then turn the needle to knit back and forth on these 4 sts only.
(K4
P4) three times
Leave the sts on the needle and break off a yard of yarn.
Rejoin the ball of yarn onto the 2nd side and;
P2tog, p2
(K4
P4) twice
K4
Then using the yarn from the first side, p across the sts on the second side to join all sts.
Next row:
Ssk, k2, k2tog
P all
Ssk, k2tog
P2
K2tog and bind off remaining st.
Sew in all loose ends, et voila!
 The reverse side...

The colours of the yarn bring to mind some lovely giant daisies that are brightening up the garden at the moment, so I thought I'd stick them in too!
